Understanding How Windshield Replacement Protects Vehicle Safety and Visibility
Introduction to Windshield Replacement and Its Importance
A windshield replacement is one of the most important maintenance procedures for preserving visibility, structural support, and occupant protection in a modern vehicle. Many drivers assume that a cracked windshield is only a cosmetic concern, yet damaged automotive glass can weaken the entire front structure of the vehicle. Even a small crack can expand because of vibration, weather changes, or road pressure, creating a serious safety concern. Replacing damaged glass at the proper time helps restore driving confidence and ensures that the vehicle continues to meet safety expectations. Understanding the complete windshield replacement process helps vehicle owners make informed decisions about maintenance and long-term road safety.
Signs That a Windshield Requires Replacement
Damage Beyond Simple Repair
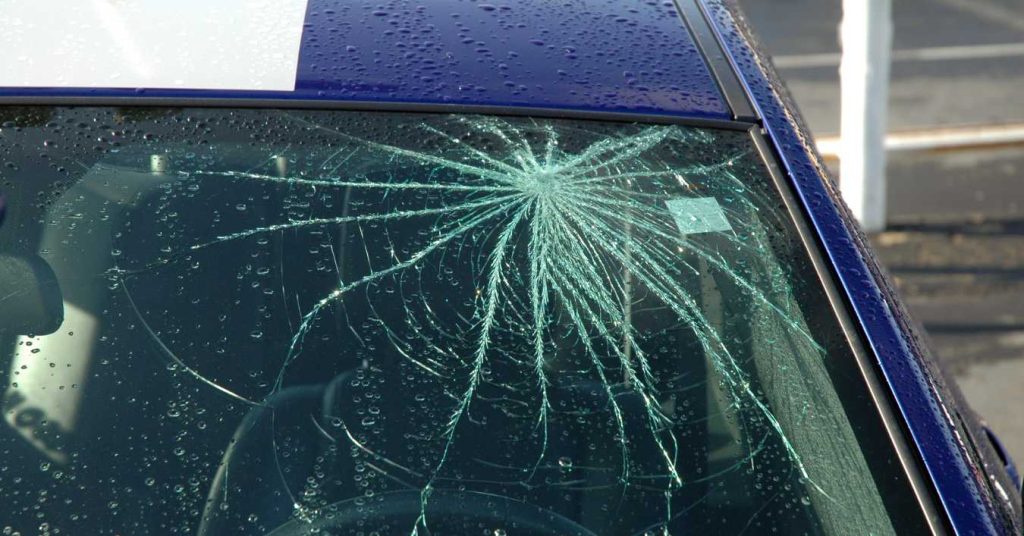
Not every damaged windshield needs replacement, but certain types of damage make repair impossible. Large cracks that spread across the driver’s line of sight often reduce visibility and weaken the laminated glass structure. Damage near the edges can also compromise the bonding strength that secures the glass to the frame. When multiple chips appear in different areas, the combined weakness can create a larger structural concern. In these situations, replacing the glass becomes the safest option because repair materials cannot fully restore original strength. Recognizing severe damage early helps prevent more expensive problems later and protects the overall safety of the vehicle.
Distortion and Visibility Problems
Some windshields appear intact but develop visibility distortion that affects safe driving. Waves, hazy spots, or uneven surfaces can interfere with the driver’s ability to judge distance correctly. This issue may result from old repairs, low-quality glass, or prolonged environmental wear. Distorted glass can create glare from sunlight or headlights, especially during early morning or nighttime driving. Even when cracks are not obvious, optical distortion can become a major hazard on busy roads. Replacement is often recommended when clarity cannot be restored through cleaning or minor repair because consistent visibility is essential for safe vehicle operation.
Preparation Before Windshield Replacement
Vehicle Inspection and Damage Assessment
Before any windshield replacement begins, technicians carefully inspect the glass and surrounding frame. They examine the extent of the damage and determine whether the mounting surface remains in good condition. Rust, old adhesive residue, or frame distortion can affect how the new glass fits into place. A proper assessment ensures that hidden issues are corrected before installation starts. Technicians may also inspect connected safety systems that rely on the windshield, including rain sensors or forward cameras. Careful preparation reduces installation errors and helps the new windshield perform correctly after the replacement process is complete.
Selecting the Correct Replacement Glass
Choosing the correct replacement glass is an essential part of the process because not all windshields are identical. Different vehicles require specific dimensions, curvature, and sensor compatibility to match factory specifications. High-quality replacement glass should meet safety standards and preserve optical clarity for comfortable driving. Some modern vehicles also need acoustic glass that reduces road noise inside the cabin. Using the proper windshield ensures the replacement fits securely and supports advanced safety features. Accurate glass selection helps maintain the original performance of the vehicle while ensuring that long-term durability remains consistent after installation.
Removing the Damaged Windshield
Safe Removal of Exterior Components
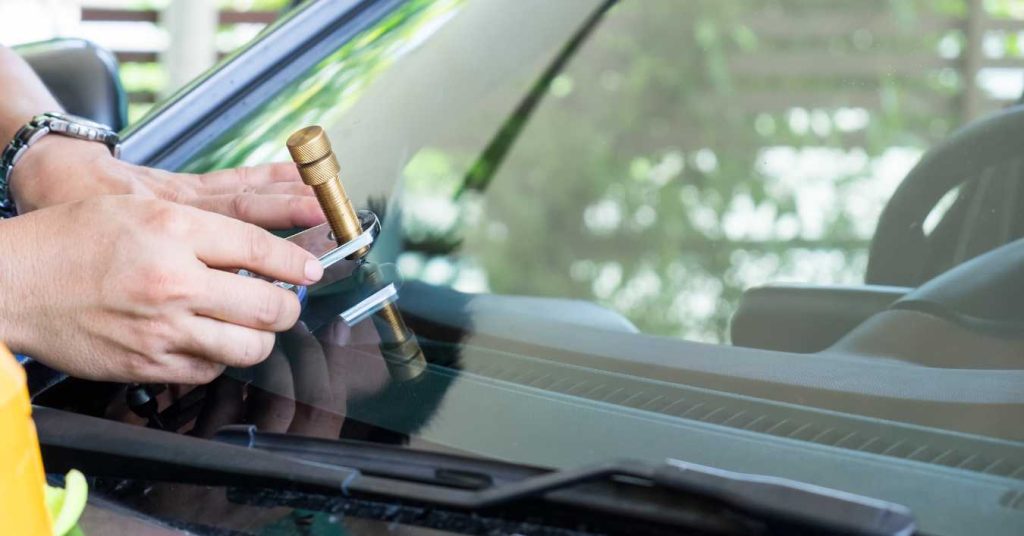
The replacement process begins by removing trim pieces, moldings, and wiper arms that surround the windshield. These exterior components must be detached carefully to avoid damaging reusable parts. Technicians use specialized tools to separate the old adhesive without bending nearby panels or scratching painted surfaces. Careful removal prevents unnecessary repairs and creates clean access to the glass edge. Protecting the surrounding area during this stage is important because even small scratches can lead to corrosion later. Proper removal techniques help ensure that the replacement process proceeds smoothly and preserves the integrity of the vehicle structure.
Cutting Away the Old Adhesive
After the surrounding components are removed, the old adhesive holding the windshield must be cut away. Technicians use precision tools designed to separate the laminated glass from the body frame without causing additional damage. The old windshield is then lifted out carefully to protect the dashboard and interior surfaces. Remaining adhesive is trimmed to create a clean bonding surface for the new installation. This stage is critical because uneven adhesive residue can prevent proper sealing. Removing the old bonding material correctly ensures the new windshield will sit evenly and create a strong connection with the vehicle frame.
Preparing the Frame for New Installation
Cleaning the Bonding Surface
Once the old windshield is removed, the exposed frame is cleaned thoroughly before installation. Dust, debris, moisture, and loose adhesive must be removed to create a proper bonding surface. Technicians inspect the pinch weld area to confirm there is no rust or structural weakness around the opening. Clean surfaces allow the new adhesive to bond evenly and securely. Any contamination left behind can reduce adhesion strength and increase the risk of leaks. Proper surface preparation is one of the most important steps in achieving a safe and durable windshield replacement that performs correctly over time.
Applying Primer for Adhesion
A special primer is often applied to the glass and frame before adhesive installation begins. This primer improves bonding strength and protects metal surfaces from corrosion. It also helps the adhesive cure properly under different weather conditions. The primer must be applied evenly and allowed to dry according to manufacturer instructions. Skipping this step can reduce installation quality and shorten the life of the new windshield. Correct primer use helps ensure the replacement glass remains securely attached during daily driving and provides reliable performance in the event of a collision.
Installing the New Windshield
Applying Automotive Adhesive
The technician applies a bead of automotive urethane adhesive around the prepared frame where the windshield will sit. This adhesive is designed to provide structural support and weather sealing after it cures. The bead must be consistent in size and shape to prevent weak spots in the bond. Modern adhesive formulas also help support airbag deployment and roof strength during accidents. Proper adhesive application is essential because uneven distribution can create leaks or glass movement. This step directly influences how safely the windshield performs after installation and during long-term vehicle use.
Positioning the Glass Precisely
The new windshield is carefully positioned using alignment tools to ensure a precise fit within the frame opening. Technicians lower the glass evenly to prevent shifting that could disturb the adhesive bead. Proper alignment is necessary for sealing, appearance, and compatibility with sensors. Even a slight misalignment can create wind noise or water intrusion later. Once the glass is in place, gentle pressure secures it into the adhesive for a firm bond. Accurate placement ensures that the windshield maintains its protective role while preserving the original design of the vehicle.
Post Installation Procedures
Curing Time and Safety Checks
After installation, the adhesive requires time to cure before the vehicle can be driven safely. Curing time varies depending on temperature, humidity, and adhesive type. During this period, technicians inspect the windshield for alignment, sealing consistency, and secure attachment. Safety checks confirm that no gaps or pressure points exist around the edges. Premature driving before proper curing can weaken the bond and reduce protection during a collision. Following the recommended curing period helps ensure the replacement performs as intended and provides full structural support.
Calibration of Safety Systems
Many modern vehicles include cameras and sensors attached to the windshield that must be recalibrated after replacement. Lane assist, emergency braking, and rain detection systems depend on accurate sensor positioning. After installation, technicians verify that these systems function correctly with the new glass. Calibration restores proper communication between the windshield and onboard electronics. Without recalibration, safety features may provide inaccurate readings or fail to operate. This step has become increasingly important as advanced driver assistance systems become more common in modern vehicles.
External Information About Vehicle Glass Safety
Drivers who want to understand national safety recommendations for automotive glass can review vehicle glass safety information. This resource explains how windshields support visibility and passenger protection in modern transportation. It also provides valuable details about safety standards that replacement glass should meet. Reviewing trusted information helps drivers understand why professional installation matters. Reliable educational resources can help vehicle owners make better maintenance decisions and avoid risks associated with poor-quality replacement work or delayed windshield service.
Common Mistakes to Avoid After Replacement
Driving Too Soon After Installation
One common mistake after windshield replacement is driving before the adhesive has fully cured. Movement and vibration can disturb the bond before it reaches full strength. This can create leaks, noise, or reduced structural performance during a collision. Technicians usually provide a safe waiting period based on environmental conditions and adhesive type. Following these instructions is important for preserving installation quality. Patience during the curing period ensures that the windshield remains secure and performs correctly once the vehicle returns to regular road use.
Ignoring Minor Installation Problems
Drivers sometimes ignore small issues after replacement, assuming they will disappear over time. Wind noise, water leaks, or slight trim movement can indicate installation problems that need attention. Addressing these concerns quickly can prevent larger complications later. Early correction often requires minimal adjustment rather than full reinstallation. Monitoring the windshield during the first few days helps identify problems before they worsen. Prompt follow-up protects the investment in the replacement and ensures the windshield continues to provide safe performance.
Conclusion
Windshield replacement is a detailed process that involves more than simply removing old glass and installing a new panel. Every stage, from inspection to calibration, contributes to safety, visibility, and structural integrity. Understanding how the replacement process works helps drivers appreciate the importance of professional service and proper aftercare. A correctly installed windshield restores the protective function of the vehicle and supports safer driving under all conditions.